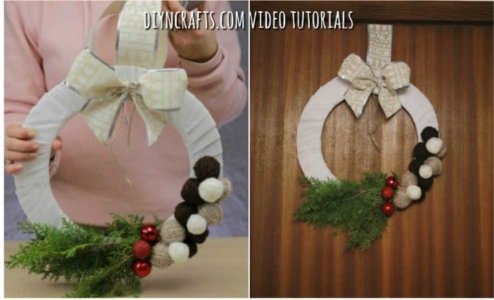
Get into the Christmas spirit with this easy DIY wreath!
By
- Replies 3
As we move closer and closer to the end of the year, it's time to start thinking about how we're going to celebrate Christmas this year.
There's no denying that most of us look forward to this time of year and everything that comes with it – the food, the gatherings, and of course, decorating our homes!
There's nothing quite like putting up some Christmas lights and setting out a few well-chosen decorations to really get us into that holiday spirit. But if you're not too confident in your own artistic abilities or you just don't have the funds to go out and buy store-bought decorations, then why not try making your own?
There are plenty of DIY projects out there for making Christmas wreaths – wreaths that can be used as adornments for your home or for hanging on the front doors. However, their number one drawback is often that most of them require materials that are difficult to obtain or are complicated to make.

Thankfully though, we've found an easy DIY Christmas wreath project from one of our very own members which requires no such bought materials nor complicated procedures! And best of all... it can easily be made at home using regular items you probably already have lying around your house! Not only is it easy to do – it's also cost-effective. Score!
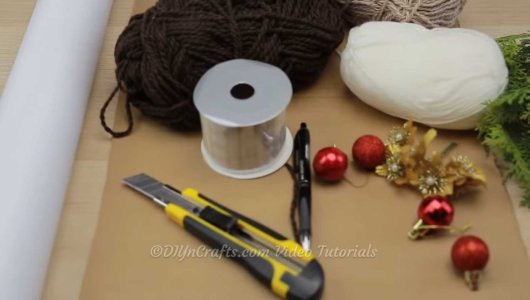
Here are the materials you need for this easy DIY project:
Cardboard
Wool
Fabric (any piece you have is good)
Ball ornaments (you can use your old ones)
Yarn
Just a note for the cardboard, any size that tickles your fancy would suffice as long as it is large enough to make the frame for your wreath. You can pick the size that suits you the most but make sure it's not too small because an overly tight frame could warp your wreath and make it distorted.
Aside from the materials, you will also need the following tools:
Knife or other tools for cutting
Pen
Hot glue / glue gun
Ruler or drafting triangle
Round object like a plate or bowl

Now that you have gathered all the supplies, it's time for the fun part– crafting! This is how to make a DIY Christmas wreath that you would surely want to share with your family and loved ones and put up on your front door every year.
The first step is to take a round object — such as a shallow dish or a large plate — and put it down in the middle of the cardboard. Use a pen or pencil to trace the circle onto the cardboard. This will be the inner edge of your wreath.
After that, make sure you draw the outer edge with a ruler or drafting triangle on the cardboard. Start at the middle of the inner edge, and then work your way around to mark at an equal distance.
When you've finished working your way around the cardboard, you should have a perfectly sketched-out circle surrounded by a larger one. Connect them when you're finished so you can cut out the cardboard wreath backing.
Then, use a knife or a similar instrument to cut out the middle. You can do this with a pair of scissors as well, but it will be a much slower process since you have to make a cut at every point where the two circles connect.
Get a large piece of fabric and then cut it into long strips. While you can use any fabric you have on hand, we highly suggest opting for a white fabric to make the wreath look extra festive.
Wrap the fabric around the wreath to cover it with cardboard, using hot glue if necessary to hold it in place.
At this point, you can start decorating your new wreath with various materials. You can choose yarn in any colour you like, and be creative with the decorations!
After you create the yarn balls, put them on the wreath with hot glue. Put the ball decorations in the lower right quadrant of the wreath, and place them in between the balls of yarn to balance them out. You can put all sorts of decorations on your wreath, just as long as you like them!
After that, put some small pine sprigs all over the wreath. Use hot glue to put them on in areas that balance the decorations and bring out the rustic atmosphere even more. To really get the Christmas spirit, you may also use real pine if you have some on hand!
Finally, put in some red and green ball ornaments. A nice idea would be to put them in between the pine sprigs and the balls of yarn so that they look like berries. Once you have added those, you can finish your wreath with a bow. We recommend making the bow yourself out of ribbon so that you can have an extra loop to hang the decoration on your door.

You can put this wreath up on your front door or on the wall, and it will stay there throughout the entire holiday season.
We also recommend checking out this video for more detailed instructions. Watch it below:
Credit: YouTube/Diy and Crafts
Happy Crafting, members! We hope this little DIY wreath idea will bring you some cheer this holiday season.
If you have any other great DIY Christmas home decor ideas to share with us, don't be shy – we'd love to read them in the comments!
Till next time, happy crafting!
There's no denying that most of us look forward to this time of year and everything that comes with it – the food, the gatherings, and of course, decorating our homes!
There's nothing quite like putting up some Christmas lights and setting out a few well-chosen decorations to really get us into that holiday spirit. But if you're not too confident in your own artistic abilities or you just don't have the funds to go out and buy store-bought decorations, then why not try making your own?
There are plenty of DIY projects out there for making Christmas wreaths – wreaths that can be used as adornments for your home or for hanging on the front doors. However, their number one drawback is often that most of them require materials that are difficult to obtain or are complicated to make.

This easy DIY Christmas wreath project will not only spruce up your home, it is also budget-friendly. Credit: YouTube/Diy and Crafts.
Thankfully though, we've found an easy DIY Christmas wreath project from one of our very own members which requires no such bought materials nor complicated procedures! And best of all... it can easily be made at home using regular items you probably already have lying around your house! Not only is it easy to do – it's also cost-effective. Score!
Here are the materials you need for this easy DIY project:
Cardboard
Wool
Fabric (any piece you have is good)
Ball ornaments (you can use your old ones)
Yarn
Just a note for the cardboard, any size that tickles your fancy would suffice as long as it is large enough to make the frame for your wreath. You can pick the size that suits you the most but make sure it's not too small because an overly tight frame could warp your wreath and make it distorted.
Aside from the materials, you will also need the following tools:
Knife or other tools for cutting
Pen
Hot glue / glue gun
Ruler or drafting triangle
Round object like a plate or bowl

The project only requires the following materials: cardboard, wool, a piece of fabric, ball ornaments, and yarn. Credit: YouTube/Diy and Crafts.
Now that you have gathered all the supplies, it's time for the fun part– crafting! This is how to make a DIY Christmas wreath that you would surely want to share with your family and loved ones and put up on your front door every year.
The first step is to take a round object — such as a shallow dish or a large plate — and put it down in the middle of the cardboard. Use a pen or pencil to trace the circle onto the cardboard. This will be the inner edge of your wreath.
After that, make sure you draw the outer edge with a ruler or drafting triangle on the cardboard. Start at the middle of the inner edge, and then work your way around to mark at an equal distance.
When you've finished working your way around the cardboard, you should have a perfectly sketched-out circle surrounded by a larger one. Connect them when you're finished so you can cut out the cardboard wreath backing.
Then, use a knife or a similar instrument to cut out the middle. You can do this with a pair of scissors as well, but it will be a much slower process since you have to make a cut at every point where the two circles connect.
Get a large piece of fabric and then cut it into long strips. While you can use any fabric you have on hand, we highly suggest opting for a white fabric to make the wreath look extra festive.
Wrap the fabric around the wreath to cover it with cardboard, using hot glue if necessary to hold it in place.
At this point, you can start decorating your new wreath with various materials. You can choose yarn in any colour you like, and be creative with the decorations!
After you create the yarn balls, put them on the wreath with hot glue. Put the ball decorations in the lower right quadrant of the wreath, and place them in between the balls of yarn to balance them out. You can put all sorts of decorations on your wreath, just as long as you like them!
After that, put some small pine sprigs all over the wreath. Use hot glue to put them on in areas that balance the decorations and bring out the rustic atmosphere even more. To really get the Christmas spirit, you may also use real pine if you have some on hand!
Finally, put in some red and green ball ornaments. A nice idea would be to put them in between the pine sprigs and the balls of yarn so that they look like berries. Once you have added those, you can finish your wreath with a bow. We recommend making the bow yourself out of ribbon so that you can have an extra loop to hang the decoration on your door.
Key Takeaways
- It is possible to make a beautiful and unique Christmas wreath from scratch using only basic, easily obtainable materials.
- This project is simple, cost-effective, and can be easily completed at home.
- There is no need for any bought materials or complicated procedures – everything can be easily done using items that are readily available.
You can put this wreath up on your front door or on the wall, and it will stay there throughout the entire holiday season.
We also recommend checking out this video for more detailed instructions. Watch it below:
Credit: YouTube/Diy and Crafts
Happy Crafting, members! We hope this little DIY wreath idea will bring you some cheer this holiday season.
If you have any other great DIY Christmas home decor ideas to share with us, don't be shy – we'd love to read them in the comments!
Till next time, happy crafting!
Last edited by a moderator:


