Double your bathroom storage with this simple DIY project
- Replies 0
Who doesn't love a good DIY home project? At the SDC, we're always looking for clever ways to improve and refresh our homes without breaking the bank or investing too much time.
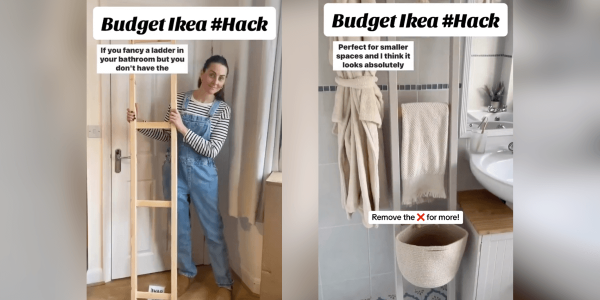
So, when we stumbled upon a tip for expanding bathroom storage using just an IKEA side unit, our interest was piqued!
Recently, a woman shared her ingenious DIY IKEA bathroom storage solution online, and we were truly impressed by her creative ingenuity. With this method, you can instantly double your bathroom storage space using a few budget-friendly items.
If you're eager to learn more about this brilliant idea, let's dive right in!
The key is to start with an IKEA IVAR side unit, which you can find for around $35. In addition to that, gather a few extra materials: multi-purpose wood filler, a hacksaw, paint, and a drill.
You'll also need nails, wooden hooks, dowels, or knobs to hang items on your side unit.
Keep in mind that this project does involve some woodworking and the use of sharp tools, so it's a good idea to have another person lend a helping hand!
Once you’ve gathered all your materials, start by , simply filling in any extra wooden holes in the side unit with the wood filler. Sand and paint the filled holes for a smooth finish.
To level out the base of the side unit, you can cut it down with the hacksaw so it stands evenly.
Then, drill two to three holes in the rungs of your side unit. You don’t have to do this on every rung, just the ones you plan to hang things from; in the video, she added dowels to only the top and bottom shelves.
Finally, you’ll want to screw hook ornaments or other hangers into the holes you’ve made.
And voila! You’ll be left with a gorgeous side unit perfect for hanging towels, bags, and other bathroom accessories.
If you didn’t quite catch the instructions, don’t worry! You can watch this neat tip below:
Once you’re done, you could even move your creation into your bedroom to give yourself some extra wardrobe storage space.
It’s a straightforward way to make the most space out of even the smallest of bathrooms and give you more workable storage. Not bad for a weekend’s work, huh?

Members, this project is both budget-friendly and easy to do, making it a perfect opportunity to teach your grandkids the basics of DIY projects. So, why not give it a try? You might enjoy it so much that you'll want to create another one!
What are your thoughts on this? Do you have any other projects you'd like to recommend? Feel free to share them in the comments below!
So, when we stumbled upon a tip for expanding bathroom storage using just an IKEA side unit, our interest was piqued!
Recently, a woman shared her ingenious DIY IKEA bathroom storage solution online, and we were truly impressed by her creative ingenuity. With this method, you can instantly double your bathroom storage space using a few budget-friendly items.
If you're eager to learn more about this brilliant idea, let's dive right in!
The key is to start with an IKEA IVAR side unit, which you can find for around $35. In addition to that, gather a few extra materials: multi-purpose wood filler, a hacksaw, paint, and a drill.
You'll also need nails, wooden hooks, dowels, or knobs to hang items on your side unit.
Keep in mind that this project does involve some woodworking and the use of sharp tools, so it's a good idea to have another person lend a helping hand!
Once you’ve gathered all your materials, start by , simply filling in any extra wooden holes in the side unit with the wood filler. Sand and paint the filled holes for a smooth finish.
To level out the base of the side unit, you can cut it down with the hacksaw so it stands evenly.
Then, drill two to three holes in the rungs of your side unit. You don’t have to do this on every rung, just the ones you plan to hang things from; in the video, she added dowels to only the top and bottom shelves.
Finally, you’ll want to screw hook ornaments or other hangers into the holes you’ve made.
And voila! You’ll be left with a gorgeous side unit perfect for hanging towels, bags, and other bathroom accessories.
If you didn’t quite catch the instructions, don’t worry! You can watch this neat tip below:
Once you’re done, you could even move your creation into your bedroom to give yourself some extra wardrobe storage space.
It’s a straightforward way to make the most space out of even the smallest of bathrooms and give you more workable storage. Not bad for a weekend’s work, huh?
Key Takeaways
- A woman has found a way to increase bathroom storage using an IKEA side unit and a bit of DIY.
- The main component is IKEA’s IVAR side unit and additional materials like a wood filler, a hacksaw, paint, a drill, and hooks or dowels.
- The project involves filling in extra wooden holes for a polished look, levelling the base with a handsaw, drilling holes for dowels or hooks and painting the unit.
- The finished side unit can be used in the bathroom for hanging items like towels and other accessories or moved to a bedroom for additional wardrobe space.
Members, this project is both budget-friendly and easy to do, making it a perfect opportunity to teach your grandkids the basics of DIY projects. So, why not give it a try? You might enjoy it so much that you'll want to create another one!
What are your thoughts on this? Do you have any other projects you'd like to recommend? Feel free to share them in the comments below!


