Unlock the secrets to preserving your food with these canning essentials
- Replies 4
It’s nice to have an alternative to the average grocery store fare when it comes to stocking up. But what are your options if you want something fresher, more nutritious and much tastier than store-bought goods?
Enter home canning. Not only does it help preserve your fruit and veg for longer periods, but it’s much cheaper and more tailored to your tastes, too! And—bonus—it’s a great teaching opportunity for everyone to learn about self-sufficiency.
The trouble is that beginning canners can quickly become overwhelmed with pint jars, wide-mouth jars, lid wands, and all the other necessary canning equipment out there.
That’s why we at SDC are here to give you the lowdown on all the home canning supplies you’ll need to embark on your canning journey.
So, without further ado, let’s dive in!
Choosing the right jars
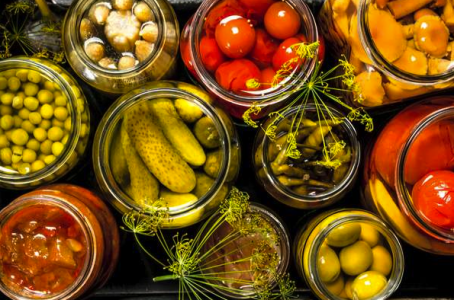
Jars are the most essential part of the process when canning your food. But not all jars are created equal. The last thing you want is to pick up some old vintage jars at a flea market only to find out later they’re unsuitable for home canning.
To prevent unnecessary disappointments, you should only go for standard canning jars, which are tempered to withstand the heat inside a canner and have specially threaded mouths designed to seal with the accompanying lids.
Check for any cracks or chips when purchasing your jars—if you spot any, discard them and choose a replacement.
Wide-mouth canning jars are great for packing whole fruits and veggies into a jar and items like pickles and relishes you’ll need to take out individually. This type is also much more suited for freezing.
On the other hand, regular-mouth jars have a narrower mouth and are best suited for sauces, soup and crushed fruits and vegetables.
The crucial canners
You’ll also need to invest in a boiling-water or pressure canner before beginning.
The boiling-water canner, also known as a water bath, is used to heat jars to 100°C to kill microorganisms in high-acid foods. It should have a rack allowing water to flow beneath the jars and handles so you can easily lower and lift them in and out of the water. There are many varieties with various sizes and finishes—but don’t forget to check the manufacturer’s instructions before using it.
Meanwhile, a pressure canner is necessary for low-acid foods (pH 4.7 or lower) like vegetables and meats. It should have a dial or weighted pressure gauge and a safety fuse, and if you’re planning to make canning into a regular hobby, a high-end version in sleek polished steel would be a great investment.
We understand that not everyone can afford a canner, so check out the video below for cheaper DIY alternatives. You can also use stock pots with lids!
Credit: Jill Winger - Old Fashioned on Purpose
A few other additional canning essentials
Aside from your jars and your canner, you should also gather a few other canning supplies for your home canning kit, such as a jar lifter for lifting jars in and out of hot water, a magnetic lid wand for removing lids from hot water and a jar funnel for guiding your items into jars without spilling.
Wash these utensils in warm, soapy water before using them to touch food, and there you have it! You’re now ready to start canning your fresh fruits and vegetables.
All that’s left to do now is take a deep breath, grab your supplies and get canning!

What are your thoughts, folks? Are you looking to start your canning journey? We hope you found this article helpful!
Enter home canning. Not only does it help preserve your fruit and veg for longer periods, but it’s much cheaper and more tailored to your tastes, too! And—bonus—it’s a great teaching opportunity for everyone to learn about self-sufficiency.
The trouble is that beginning canners can quickly become overwhelmed with pint jars, wide-mouth jars, lid wands, and all the other necessary canning equipment out there.
That’s why we at SDC are here to give you the lowdown on all the home canning supplies you’ll need to embark on your canning journey.
So, without further ado, let’s dive in!
Choosing the right jars
Jars are the most essential part of the process when canning your food. But not all jars are created equal. The last thing you want is to pick up some old vintage jars at a flea market only to find out later they’re unsuitable for home canning.
To prevent unnecessary disappointments, you should only go for standard canning jars, which are tempered to withstand the heat inside a canner and have specially threaded mouths designed to seal with the accompanying lids.
Check for any cracks or chips when purchasing your jars—if you spot any, discard them and choose a replacement.
Wide-mouth canning jars are great for packing whole fruits and veggies into a jar and items like pickles and relishes you’ll need to take out individually. This type is also much more suited for freezing.
On the other hand, regular-mouth jars have a narrower mouth and are best suited for sauces, soup and crushed fruits and vegetables.
The crucial canners
You’ll also need to invest in a boiling-water or pressure canner before beginning.
The boiling-water canner, also known as a water bath, is used to heat jars to 100°C to kill microorganisms in high-acid foods. It should have a rack allowing water to flow beneath the jars and handles so you can easily lower and lift them in and out of the water. There are many varieties with various sizes and finishes—but don’t forget to check the manufacturer’s instructions before using it.
Meanwhile, a pressure canner is necessary for low-acid foods (pH 4.7 or lower) like vegetables and meats. It should have a dial or weighted pressure gauge and a safety fuse, and if you’re planning to make canning into a regular hobby, a high-end version in sleek polished steel would be a great investment.
We understand that not everyone can afford a canner, so check out the video below for cheaper DIY alternatives. You can also use stock pots with lids!
Credit: Jill Winger - Old Fashioned on Purpose
A few other additional canning essentials
Aside from your jars and your canner, you should also gather a few other canning supplies for your home canning kit, such as a jar lifter for lifting jars in and out of hot water, a magnetic lid wand for removing lids from hot water and a jar funnel for guiding your items into jars without spilling.
Wash these utensils in warm, soapy water before using them to touch food, and there you have it! You’re now ready to start canning your fresh fruits and vegetables.
All that’s left to do now is take a deep breath, grab your supplies and get canning!
Key Takeaways
- Canning your food at home can save money and reduce waste.
- Different sizes and types of jars are recommended for different types of food, with wide-mouth cans ideal for pickles or whole fruit and regular-mouth cans for sauces or crushed fruits and vegetables.
- A boiling-water canner heats jars to 100°C to kill microorganisms found in high-acid foods such as fruits, tomatoes, pickles, relishes, jams, jellies, and marmalades.
- Useful tools for canning your food include a jar lifter for moving jars in and out of hot water and a wide and short jar funnel for preventing spills and guiding food into jars.
What are your thoughts, folks? Are you looking to start your canning journey? We hope you found this article helpful!

