Transform your walls with this DIY-friendly hack – no power tools required!
- Replies 2
DIY projects don’t just have to be about moving furniture around or rearranging artwork. Even if you’re not a self-proclaimed handyman or woman, there are plenty of little things you can do to make a big impact on the interior of your home.
Take wall panelling for example. Wall panelling is a great way to bring a more luxurious aesthetic to your interiors, but it usually requires patience and power tools. Not everyone has the time to make big changes and not everyone has all the necessary tools at their disposal.
Fortunately, a TikTok user recently unveiled a DIY-friendly hack that requires none of those things.
A woman who goes by @filiz.interior on TikTok filled us in on how to beautify your home with less effort and without timber mouldings.
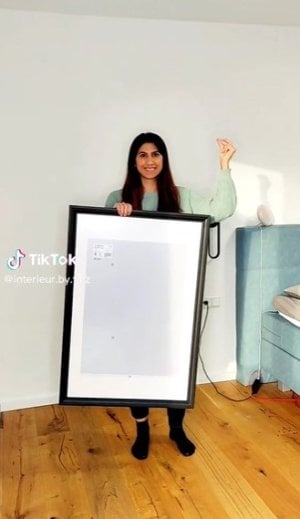
She demonstrated the hack in a clip where she used several IKEA picture frames to make multiple rectangle shapes on the bottom half of her wall.
She chose the Edsbruk frame in the 61 x 91 cm size, which costs $59.
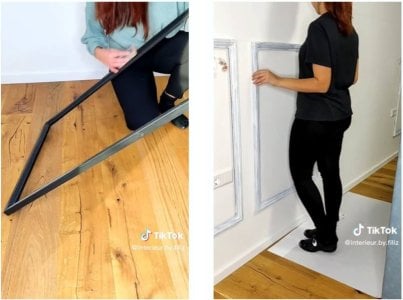
She then attached the five frames to her walls, placing them at the same height with an equal distance apart, like this:
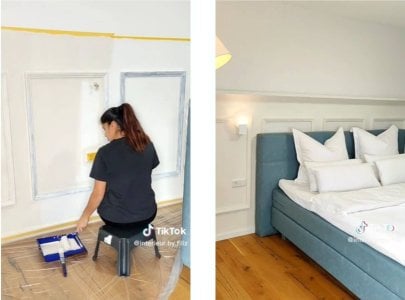
Then, she painted the wall and frames the same colour, and added a picture rail in the middle of the wall to finish it off. Easy, right?
The hack, which has been viewed over 1.6 million times on the social media platform, received a lot of praise from many users online. Some have noted, however, that it wasn’t the cheapest way to add wall panelling.
Still, it is likely the easiest way.
‘Now that’s what an IKEA hack is all about!’ One shared.
IKEA Canada even responded to the woman’s hack and was impressed with her ‘amazing results’.
‘Genius with the shelf! Little more expensive but also so much easier!’ Another added.
While someone else commended the woman for working smarter and not harder. ‘This is a great idea for people renting. They could also use command strips to attach the frames,’ they added.
You can watch the DIY hack below:
But if you don’t want to pay for individual photo frames, you can always head to your local hardware store! You can buy pieces of timber moulding for much less and a lot of stores will cut it to size for you.
Or, you can follow our tips on how to panel a wall. But first, you need a couple of essentials:
Then, using a tape measure, work out the full width and height of the wall, including the top, base, and side panels. Double-measure everything just to be sure!
Next, cut the panels. This will depend on the size of your wall or how much you want to panel. Using a saw and mitre box at a 90-degree angle, carefully cut the panels that will be horizontally placed according to your wall’s measurements.
The next step is to sand and smooth down your walls. You can either use sandpaper or an electric sander if you have one. This prepares your walls for the panels and removes lumps or bumps which may show through.
Finally, you can apply the panels to your walls. Start by adding the frame. First with the base panels, then with the top. Place your panels onto the marked wall and use a laser level to ensure the panel is straight. Apply a strong adhesive to the back and apply this to the wall, making sure that you press down firmly as you do this step. Use both nails and glue to keep your panels in place.
Continue adding the vertical panels first, and then the horizontal panels next. If you have any gaps, such as cracks or holes, you can fill them with some decorators caulk or filler, or paint.
The last step is to paint your walls. But before you do, make sure that the adhesive and decorators and filler (if you used any) are fully dry and have set.
 Have you tried any DIY home improvements before? How did it turn out? Share your experiences and tips with us in the comments below!
Take wall panelling for example. Wall panelling is a great way to bring a more luxurious aesthetic to your interiors, but it usually requires patience and power tools. Not everyone has the time to make big changes and not everyone has all the necessary tools at their disposal.
Fortunately, a TikTok user recently unveiled a DIY-friendly hack that requires none of those things.
A woman who goes by @filiz.interior on TikTok filled us in on how to beautify your home with less effort and without timber mouldings.
She demonstrated the hack in a clip where she used several IKEA picture frames to make multiple rectangle shapes on the bottom half of her wall.
She chose the Edsbruk frame in the 61 x 91 cm size, which costs $59.
She then attached the five frames to her walls, placing them at the same height with an equal distance apart, like this:
Then, she painted the wall and frames the same colour, and added a picture rail in the middle of the wall to finish it off. Easy, right?
The hack, which has been viewed over 1.6 million times on the social media platform, received a lot of praise from many users online. Some have noted, however, that it wasn’t the cheapest way to add wall panelling.
Still, it is likely the easiest way.
‘Now that’s what an IKEA hack is all about!’ One shared.
IKEA Canada even responded to the woman’s hack and was impressed with her ‘amazing results’.
‘Genius with the shelf! Little more expensive but also so much easier!’ Another added.
While someone else commended the woman for working smarter and not harder. ‘This is a great idea for people renting. They could also use command strips to attach the frames,’ they added.
You can watch the DIY hack below:
But if you don’t want to pay for individual photo frames, you can always head to your local hardware store! You can buy pieces of timber moulding for much less and a lot of stores will cut it to size for you.
Or, you can follow our tips on how to panel a wall. But first, you need a couple of essentials:
- MDF wood panelling
- A spirit level
- Glue (or a similar brand)
- Decorators caulk
- Saw or cutter
- A notebook and pen to jot down sizes
- Paint
- Sandpaper or an electric sander
- Hammer
- Pin
- Tape measure
- A calculator (we recommend trying this calculator and online visualiser to get the measurements correct).
Then, using a tape measure, work out the full width and height of the wall, including the top, base, and side panels. Double-measure everything just to be sure!
Next, cut the panels. This will depend on the size of your wall or how much you want to panel. Using a saw and mitre box at a 90-degree angle, carefully cut the panels that will be horizontally placed according to your wall’s measurements.
The next step is to sand and smooth down your walls. You can either use sandpaper or an electric sander if you have one. This prepares your walls for the panels and removes lumps or bumps which may show through.
Finally, you can apply the panels to your walls. Start by adding the frame. First with the base panels, then with the top. Place your panels onto the marked wall and use a laser level to ensure the panel is straight. Apply a strong adhesive to the back and apply this to the wall, making sure that you press down firmly as you do this step. Use both nails and glue to keep your panels in place.
Continue adding the vertical panels first, and then the horizontal panels next. If you have any gaps, such as cracks or holes, you can fill them with some decorators caulk or filler, or paint.
The last step is to paint your walls. But before you do, make sure that the adhesive and decorators and filler (if you used any) are fully dry and have set.
Key Takeaways
- A TikToker has revealed a quick and easy way to add wainscoting to your walls without having to cut pieces of timber or drill a hole.
- The DIYer used several IKEA picture frames, which she sanded and painted, and then attached to her walls.
- The DIY hack has been popular online, though viewers noted that it may not be the cheapest method.


